How to Plant a Rooftop Garden
Whether you have a green thumb or not, there are plenty of advantages to a personal garden. Beside the simple pleasure that comes with growing your own fruits and vegetables, maintaining a garden can improve your health and promote sustainability. And for people who think they don’t have the space to create an incredible garden, it’s time to look up.
Sure, the upfront costs and workload may be more intensive, but with the proper preparation, installing a rooftop garden can put a land-challenged green thumb to use.
Rooftop Prep
Weight Capacity
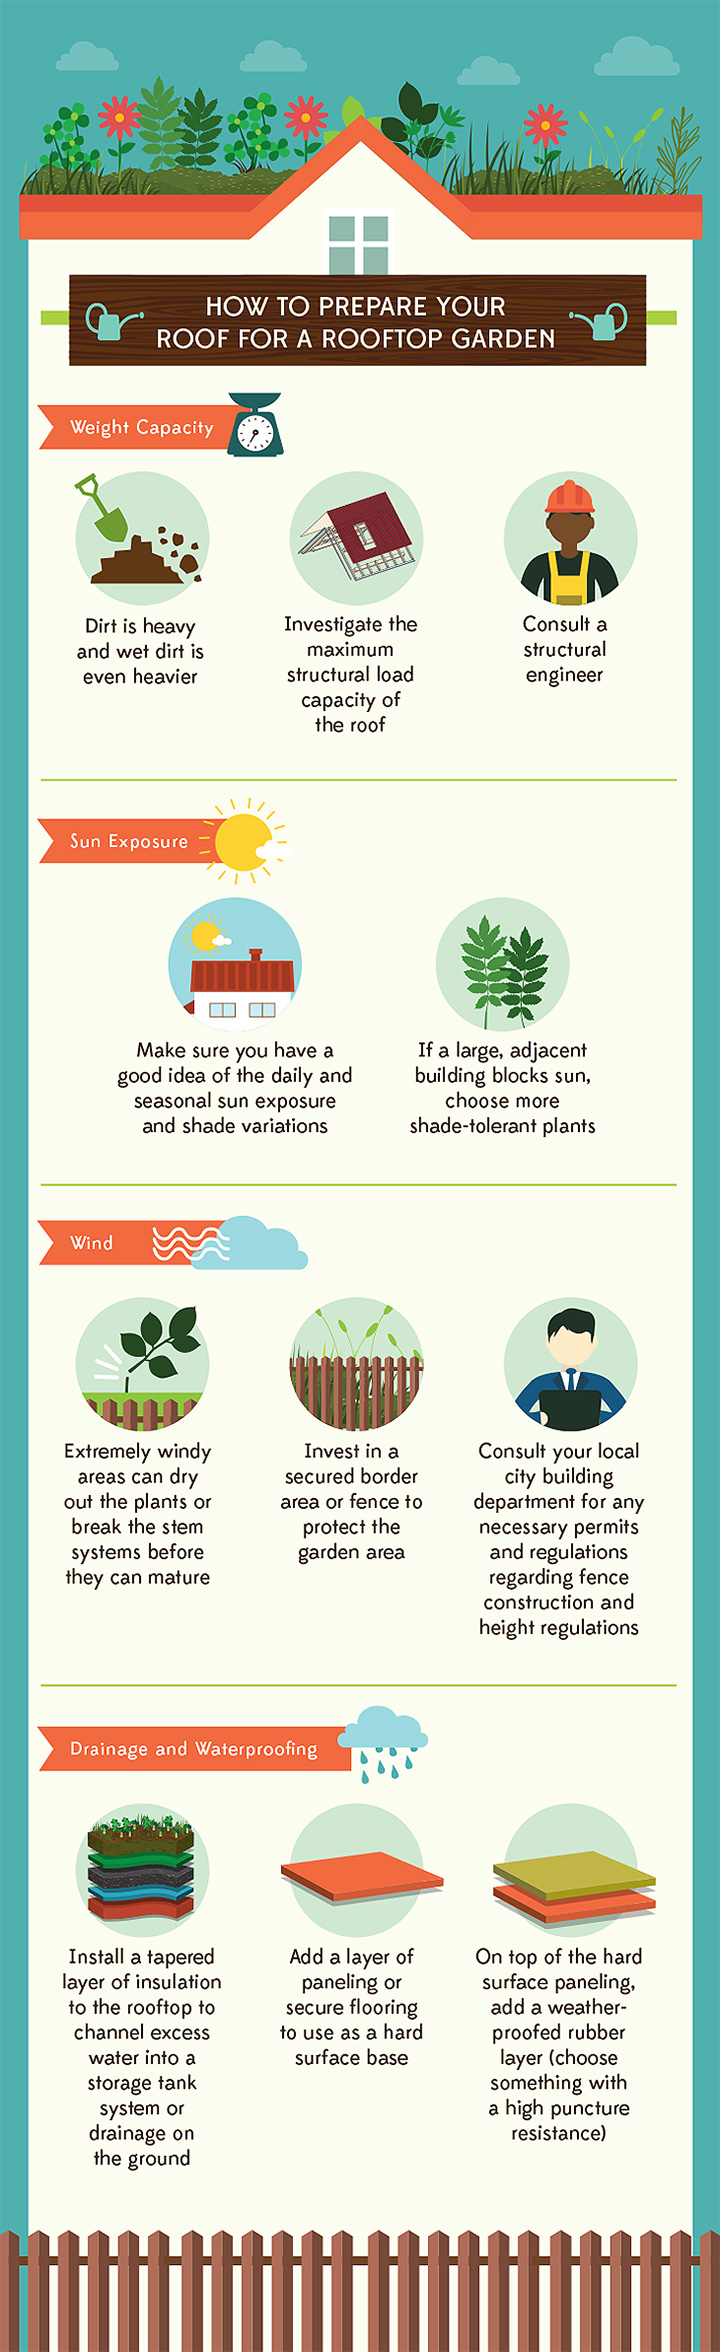
If you remember only one piece of advice before installing a rooftop garden, remember this: Dirt is heavy and wet dirt is even heavier.
When outlining a rooftop garden installation strategy, first investigate the maximum structural load capacity of the roof. This is where consulting a structural engineer is necessary. Improper planning may cost you dearly in the long run, so make sure to calculate the maximum weight capacity your roof can handle before installation.
Environmental Factors
Once you’ve established the area that will be converted into a garden, there are some additional environmental factors to consider. Before outlining the shape of your garden, consider the type of sun and wind exposure on the roof.
Sun Exposure
Obviously, sunlight will be an important factor for growing any type of plant, so make sure you have a good idea of the daily and seasonal sun exposure and shade variations in your particular location.
Also, sun exposure dictates which plants, flowers, herbs, and veggies you can grow. Typically, rooftops receive a lot of direct sun, so if that’s the case, there are many options because most vegetables grow best in full sun (at least six hours of unobstructed, direct sunlight). However, if you’re dealing with a large, adjacent building that blocks sun to your rooftop, more shade-tolerant plants and veggies—such as kale, lettuce, and spinach—will fare better.
Wind
Generally speaking, roofs may experience more windy conditions than conventional gardens. Give some major thought into wind protection, both for the garden and passersby below.
A rooftop garden with good airflow is great for most plants, but extremely windy areas can dry out the plants or break the stem system before they can mature. Of course, in addition to broken plants, the last thing you really want is for materials or tools to blow off into the street below.
Before installing an elaborate gardening system, invest in a secured border area or fence to protect it. Consult your local city building department for any necessary permits and regulations regarding fence construction and height regulations.
Drainage and Waterproofing
Once you have planned out your garden’s size and dimensions, the next step is to waterproof and prepare a proper drainage system.
Cutting corners on rooftop drainage and waterproofing is a big mistake. Not only will you have a soggy garden with drowned roots, but you could set yourself up for serious structural damage.
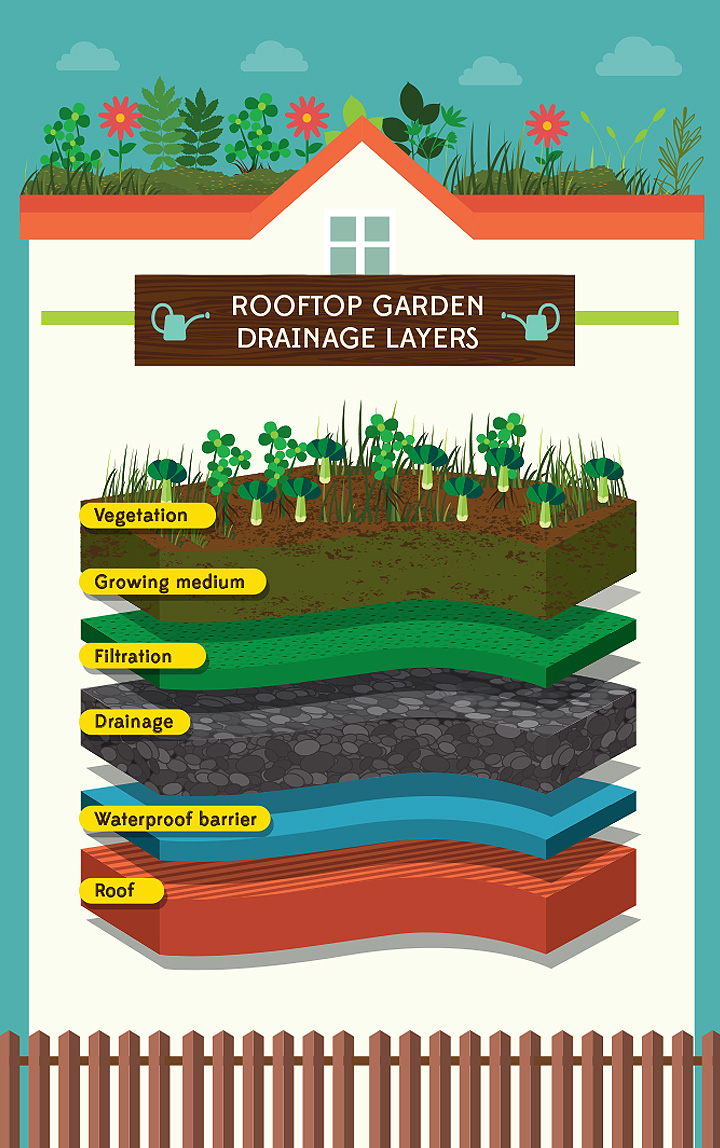
First, install a tapered layer of insulation to the rooftop to channel excess water into a storage tank system or drainage on the ground. This will, of course, depend on your living situation. If you own your building and can do as you please with the property, you may want to consider draining the water into tanks to use as a part of a greywater irrigation system.
On top of the insulation, add a layer of paneling or secure flooring to use as a hard surface base. Deck paneling is one viable option. The objective here is two-fold: provide a base for the garden and keep roots from making their way to the actual roof below, which can cause damage to your home.
On top of the hard surface paneling, it’s wise to add a weatherproofed rubber layer. A pond liner is easy to find, but you may want to splurge on a sturdier option such as an EPDM rubber membrane.
Whatever type of waterproofing layer you use, make sure to choose something with a high puncture resistance. This will provide more stability as you move around the garden.
When installing the weatherproof layer over the roof, extend the layer over the roof’s edge just a bit (a good 5 inches) to prevent rainwater from leaking underneath the waterproof layer.
Rooftop Garden Containers
While occupying the entire rooftop with dirt is enticing, you may want to install special gardening trays to give you more flexibility when moving about the garden. Although you may want to play in the dirt as much as possible, there will be times you’ll want to do a little bit of maintenance without stepping in the soil.
In order to organize the garden (and avoid messy boot prints), consider special gardening containers. Look for lightweight containers that come with integrated drainage systems. These containers are fairly straightforward to install and make removal easier should you move or need to repair the rooftop.
Alternatively, there are companies that deliver trays fully loaded with soil specifically designed for green roofs. Modular planting systems, such as those designed by The Green Grid, can be quite useful—especially since their systems usually come with specific instructions and customer service. However, pre-fab garden containers can be costly.
Repurposing Garden Containers
Instead of converting the entire base of your roof into a garden, you could repurpose discarded materials such as old bathtubs or sinks into creative planters. Even worn-out wheelbarrows or plastic kiddie pools can get a new life as a gardening container.
If you choose to go this route, you may not have to worry as much about your roof’s structural capacity. However, for the sake of healthy plants, you’ll still have to create a drainage system within the repurposed container. Keep in mind that although drilling a few simple drainage holes in any container may keep the root system properly drained, you will still have to protect the roof from the constant water drippage.
To properly protect the roof from water damage, you’ll want to install some sort of water collection system underneath any gardening containers so dripping water does not penetrate the rooftop.
Depending on the size and number of containers in your garden, you have a number of options for protecting the roof. If you just have a few containers and little water drainage, you could place some plastic containers underneath and manually empty the water periodically.
Or, to keep your workload at a minimum, install a collective water gathering system. If you’re feeling extra confident in your DIY skills, you could construct a system to collect both excess drainage water and rainwater to be used in irrigation of your garden. But keep in mind that if you’re going to be using rainwater for irrigation of edible crops, there is some controversy about the potential health effects.
Rooftop Garden Crops
When you begin to design your rooftop garden, think about what types of plants you will grow based on your rooftop’s environment and materials you’d like to use.
Generally speaking, rooftop gardens receive a lot of sun exposure, so look for plants that enjoy direct sun and heat. Most herbs enjoy full sun, so a nice, fragrant herb garden is a great idea. Additionally, if you’re looking to make a fully edible garden, you’ll want to choose plants that grow low and have a thick root system to avoid potential wind damage. Root veggies including carrots, beets, and rutabagas are good low growers. Watermelon, spinach, most leaf lettuces, cherry tomatoes, zucchini, cucumbers, and peppers typically grow well in full sun and make ideal crops for rooftop gardens.
Rooftop Garden Soil
With a good garden design in mind, it’s time to plant!
Planting a rooftop lemon tree orchard would require a lot of intensive structural preparation. But growing a sweet herb or veggie garden bordered with some beautiful perennials is much simpler.
As a general rule, standard green roofs need to hold at least four inches of soil and withstand about 15 to 20 pounds per square foot. This is a general estimation because with a deeper soil capacity, you’ll have more options for planting. However, four inches is sufficient to grow a wide range of flowers, veggies, and herbs.
For most types of rooftop gardens, you may want to consider using a specific type of planting medium instead of common potting soil. Unless you have a lot of space to create your own compost system, a lightweight soil specifically made for green roofs is ideal. Specially made rooftop garden soil generally contains a highly engineered blend of minerals and organic matter that is genetically designed to be lightweight, retain water, and ensure proper drainage. This is key for a garden environment with lots of direct sunlight and little shade.
For the most part, planting a rooftop garden is very similar to most basic, in-ground gardens. It takes a lot of planning and work to get a garden to thrive, and rooftops are no different. Once you have a sound structural plan set up that allows for proper drainage, you’ll be ready to plant any number of plants, flowers, herbs, and veggies.
 If this article has you interested in starting your own rooftop garden, you might want to check out these custom sinks to use as planters. — http://www.custommade.com/gallery/custom-sinks/


Nicole Jewell
Latest posts by Nicole Jewell (see all)
- Harnessing the Power of Poo - May 26, 2015
- Raise the Roof - May 8, 2015